Tulppa® flooring system installation instructions Ardex


Ardex products:
- Adhesive/sealing compound: Ardex CA 20 P
- Waterproofing: Ardex 8+9 or Ardex S 1-K
- Reinforcement tape: Ardex SK 12 reinforcement tape
- Inlet cuff: Ardex SRM
- Floor drain cuff: Ardex STA floor drain cuff or Ardex STB 75-15 reinforcement tape
- Adhesive mortar: Ardex X 78
- Sealing grout: Ardex G6 FLEX or Ardex G8S FLEX
- Sanitary silicone: Ardex SN or Ardex SE
Finnfoam Oy products:
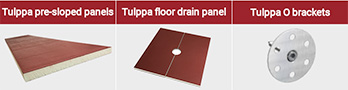
- Tulppa pre-sloped panels
- Tulppa pre-sloped panel 1
- Tulppa pre-sloped panel 2
- Tulppa floor drain panel (Vieser)
- Tulppa O brackets
For timber-framed and panel-constructed floors the structure of the floor and its rigidity are based on the instructions provided by the designer of the structure and the manufacturer of the wooden panels. The rigidity of the base must be sufficient for the surface structure system. The waterproofing system is installed according to the supplier's instructions. The Ardex surface structure system products have been tested specifically with the Finnfoam Tulppa floor panels (Testing report No. VTT-S-00597).
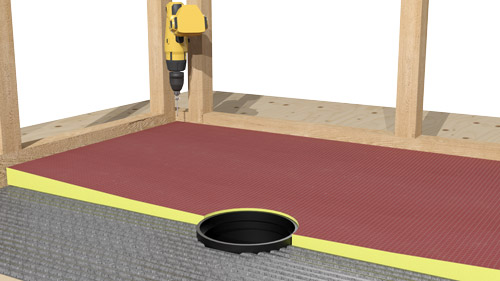
Attaching the Tulppa floor panel
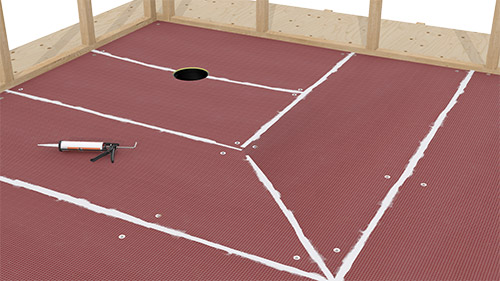
The Tulppa floor panel is attached to the wood panel base using Ardex X 78 adhesive mortar. The mortar is spread on top of a clean surface using a 6 x 6 x 9 notched mortar applicator and the Tulppa panel is placed on top of the fresh coat of mortar and pressed down with sufficient force. The panels can be attached to the base while the mortar dries using Tulppa O brackets or weighted down with stacks of panels, for example. A continuous line of Ardex CA 20 P adhesive compound is applied to each joint between the panels as they are installed. The adhesive compound is applied to the edge/groove of the previous panel and the panels are pushed tightly together. Any excess paste is spread evenly on top of the panels with a trowel. If you use Tulppa O brackets to temporarily attach the panels, you must remove the brackets once the mortar has dried and fill in the holes with Ardex CA 20 P adhesive compound before the next working stage.
Boundaries
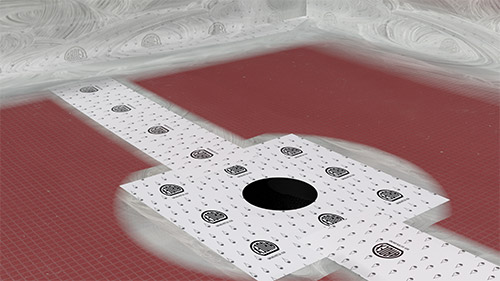
Waterproofing
With the Tulppa flooring solution, the panels are always covered completely with waterproofing which extends 100 mm up the wall if the wall is covered with Tulppa panels. The intersections between the wall and the floor and the joints between the Tulppa floor panels are treated with Ardex 8+9 or S 1-K waterproofing. Ardex SK 12 reinforcement tape is pressed on top of the fresh waterproofing layer at all panel joints such that no air pockets remain between the tape and the base. The reinforcement tape is covered completely with waterproofing. Any edges that may have been damaged during the installation of the panels are patched with Ardex 8+9 or Ardex S 1-K waterproofing and Ardex SK 12 reinforcement tape.
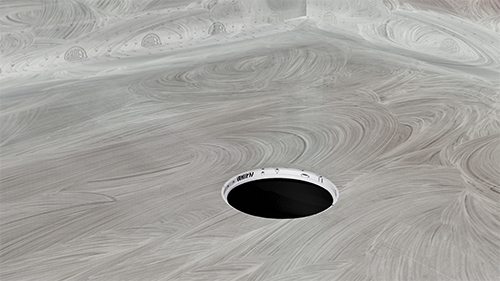
For a plastic point drain with seals and a tightening ring (for example Vieser), waterproofing is joined using an Ardex STA 40 x 40 floor drain cuff according to the installation instructions of the waterproofing system.
The flange sections of steel-flanged linear drains (for example Unidrain) are cleaned with acetone. If you are using Ardex 8+9 waterproofing, join the waterproofing for a steel-flanged drain using Ardex 8+9 waterproofing and Ardex SK 12 reinforcement tape. Apply a substantial amount of Ardex 8+9 waterproofing on to the steel flange and around the floor drain and press Ardex SK 12 reinforcement tape on top of the fresh waterproofing such that no air pockets remain between the tape and the base. After the tape has dried, apply waterproofing throughout the surface of the tape.
Tiling
Tiles are attached using Ardex X 78 adhesive mortar.
Grouting
Porous tiles are grouted with Ardex G6 sealing grout and leak-proof tiles with Ardex G8S sealing grout.
Flexible joints at intersections are sealed with Ardex SN or Ardex SE sanitary silicone, depending on the color of the grouting.